Corelabs Guide
Table of Content
4. Contact
In order to take advantage of all dynamic features of the system, it is recommended that users upgrade their web browsing software to the newest version available.
Internet Browsers:
Minimum versions and supported browsers include:
- Google Chrome - v. 28
- Mozilla Firefox - v. 22
- Microsoft Internet Explorer/Edge - v. 10
- Safari – v 5.1.7
Cookies and JavaScript are required and must be ENABLED.
Screen Resolution:
Minimum recommended screen resolution is 1024x768 pixels. Setting screen resolution to a lower values may adversely affect user’s experience.
2. Concepts and terminology used in this guide.
I. Facility, Equipment, Service dropdown options.
- "Facility" - Describes a general administrative unit that contains equipment or other abstract resources.
- "Equipment/Resource" - Specific type of resource (e.g room, equipment) that a user might be interested in. A facility can host multiple resources/equipment.
- "Service" - Specific service provided by equipment/resource. (e.g Confocal Imaging, TEM, TEM + EDAX). One resource/equipment can provide multiple services.
II. Service state options.
- "Active" - Active service is open to all authorized users.
- "Locked" - Locked services are visible to all authorized users but adding new bookings is not be possible. This options can be enabled if booking should be temporarily restricted. Facility managers' ability to control the calendar is not affected by this option.
- "Inactive" - An inactive service will appear only for service managers. Inactive service is invisible to active users.
The system can be accessed online at http://corelabs.ccny.cuny.edu
STEP 1: User Registration.
A new user can register with the system by filling out the registration form accessible by clicking the "Register" button found in the upper right hand corner of the page (Fig 1).
Figure 1. "Register" and "Cannot log in" buttons.
Please fill out all the fields as instructed by the system. Pay close attention to the format for each field, especially the e-mail and the phone number.
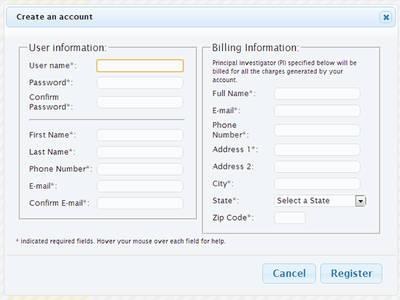
Figure 2. Registration Form.
STEP 2: Account Approval by System Administrator.
Upon successful registration, system administrators will receive a notification and complete your account approval by assigning correct PI and account type. New users are notified by e-mail when accounts are approved.
STEP 3: Request Access to Services.
After an account is approved, a user will be be able to log in and browse through calendars available in the system. A new user, however, will not be able to access calendar details and book time. Access to each facility or service can be requested by clicking the "Request Access" button displayed in the center of the screen.
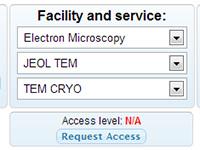
Figure 3: "Request Access" button.
Clicking the "Request Access" button will change user's access level to "Pending Approval". Access must be requested to ALL services and equipment that a user wishes to work on.
STEP 4: Facility Administrator Approval.
A facility manager reviews access requests and approves them accordingly. Users will be notified by e-mail about the outcome. Approval may not be granted immediately due to training requirements and other rules pertaining to each facility. Once access is approved, the role indicator in Fig 3 will change to "Authorized User".
STEP 5: Scheduling, Editing and Cancelling a Session.
Scheduling a session can be accomplished by holding the left mouse button down and moving the mouse to select desired time range.
Please note that users accessing the system from mobile devices may experience issues with dragging while using touch screens. In such cases, tapping screens may be a sufficient alternative.
Clicking on an existing booking will reveal more details and provide options to cancel the session (if permitted) and add a note (see figures below).
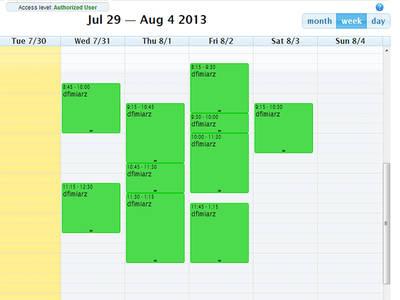
Figure 4: Session scheduling.
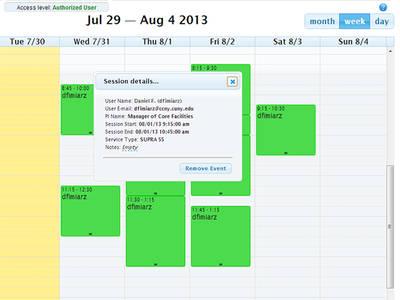
Figure 5: Booking details and session cancellation.
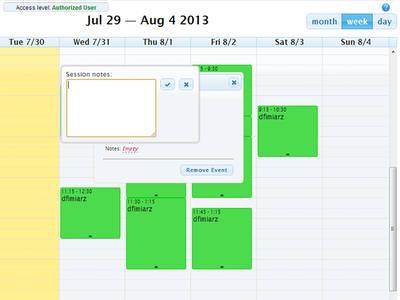
Figure 6: Note editing.
Editing the booking time, if permitted, can be accomplished in a few different ways.
- Utilize drag and drop functionality to move the entire session to a new location in the calendar.
- Use small handle at the bottom of the session rectangle to extend or shorten duration.
- Canceling a session and creating a new one to replace it.
There are some important session booking limitations that users should be aware of.
- Booking is normally permitted for sessions that start in the future. Retroactive booking is not allowed.
- Moving sessions to the past is not allowed.
- Bookings cannot overlap.
- Cancelling a session that has already started is not allowed. Such session duration can be edited using the handle method described above.
It is also important to remember that each facility may have it's own rules that may add additional limitations/restrictions on booking time. Please visit facility pages at https://www.ccny.cuny.edu/corefacilities or contact corresponding facility mangers directly for additional assistance.
CCNY CoreLABS System Administrator:
Daniel Fimiarz
MR 1308
City College of New York
New York, NY 10031
E-mail: corelabs@ccny.cuny.edu
Phone: 212-650-8596.
Last Updated: 06/22/2026 03:38